
You sense it. The red light on your dashboard plus dim headlights clearly hint that something is amiss. A few more diagnostics, and you spot the culprit.
It’s the alternator. Though the battery is working perfectly well, the alternator is failing to keep it charged. So you think about having the alternator replaced by your mechanic.
But it’s you’re strapped for cash. You’re not going to spend a couple hundred dollars to repair something that you could fix yourself.
Thankfully, changing an alternator is nothing close to rocket science. Sure, all the bolts and wires may seem daunting at first, but that shouldn’t scare you. With a little bit of research and hard work, even a beginner to car maintenance can replace their alternator.
This guide will prove to you just how straightforward the whole procedure can be.
Let’s roll.
- Exploring the Car Alternator
- What You Need to Know About Replacing an Alternator
- Change an Alternator in These Easy Steps
- Step 1: Disconnect the battery
- Step 2: Disconnect the wires
- Step 3: Identify and remove the alternator belt from the pulley
- Step 4: Unbolt and remove the alternator
- Step 5: Slide the new alternator in place
- Step 6: Slide the belt over the alternator
- Step 7: Plug in the power cable and wiring harness
- Step 8: Reconnect the battery
- Final Thoughts
Exploring the Car Alternator
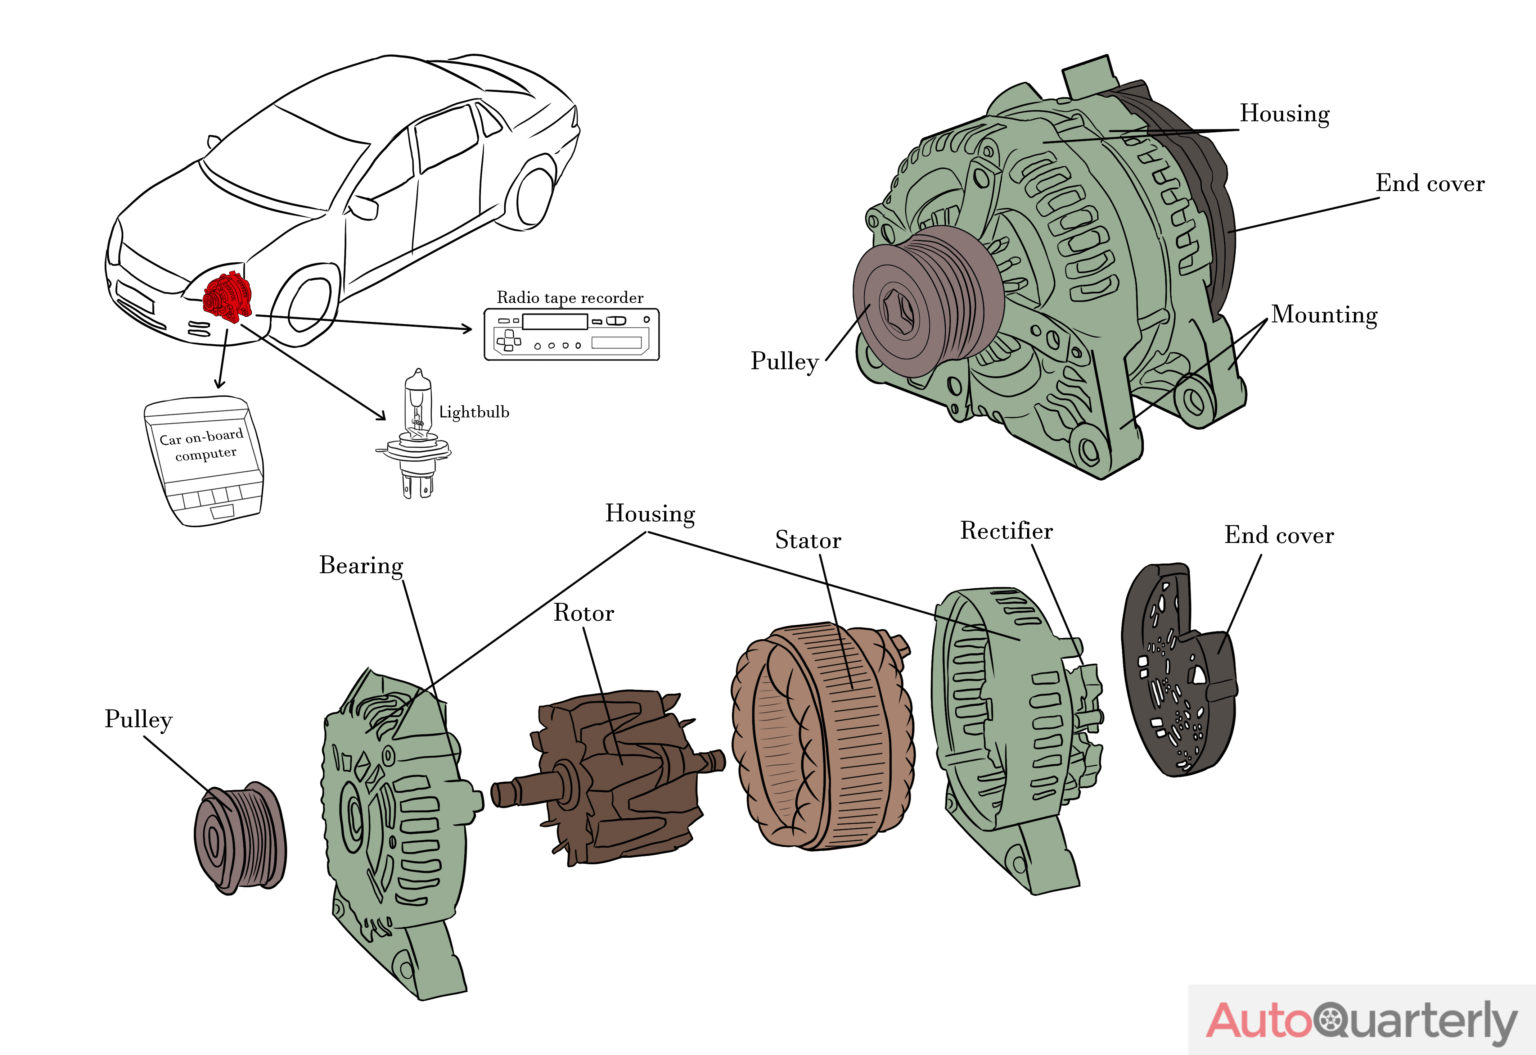
Think of the alternator as a power generator located near the front of the engine in your car. There are three components of a car’s charging system: the voltage regulator, the battery and the alternator.
How an alternator works
It’s widely assumed that the battery supplies all of the power required by a car’s electrical system.
That’s not the case.
The battery channels electrical current to the starter motor, which helps the engine to start. Once the engine gets rolling, the alternator collaborates with the battery to supply current to the car’s electrical system. At the same time, the alternator charges the battery for later use. The finer details of the method by which alternators work are somewhat complicated, but that basics aren’t too difficult to grasp.
The mechanism behind this is the spinning of pulleys under the hood by the car’s combustion engine. Consequently, this turns the alternator’s pulley, thus harnessing energy. When this happens, an alternating current (AC) is produced which passes through a magnetic field and gets converted to direct current (DC) by a device called a rectifier.
Signs that your car alternator is failing
There are several pointers to alarm you when your car’s alternator is sick and dying. Most of these are directly related to the car’s electronics, since powering it is the primary role of the alternator.
The easiest to spot is the typically battery-shaped “charge” warning light on the dashboard. While normally this should disappear after you start the car, its continued presence indicates a fault in your car’s charging system. The alternator is usually the problem, though this could also indicate battery problems or other electrical issues.
Pulsating headlights from dim to bright is another sign of a faltering alternator. The electrical components of your car, such as your radio and internal lights, may also work intermittently, thus indicating insufficient current. In some car models, there may be a squealing noise from the engine or a buzzing noise coming from the alternator.
If your car won’t start altogether, this may be another sign of a dead or dying alternator. If this occurs, you should jump the car (either with the help of a friend or using a jump-start kit) then follow the rest of this guide to make sure that your car will start on its own next time.
While most of these signs point to a failing alternator, there’s no harm in testing it just to be sure that’s the cause.
This can be done through a battery and charging system diagnostic called an amps, voltage, and resistance (AVR) test or through a simple voltage test, both of which examine the state of the charging system.
What You Need to Know About Replacing an Alternator
Doing an alternator replacement is a fairly easy task, although you’ll need a few things to get started. Some handy tools to grab include;
- A new car alternator (of course!)
- Rags or cleaning towels
- Gloves
- Ratchet/socket set
- Wrench set
The procedure takes about two hours or less, depending on your speed. If you’re new to car repair, or if you’re looking to upgrade a throw-together set of loose tools, we have a helpful guide to assist you with purchasing a toolset that will contain everything you could possibly need to solve most common car problems.
Change an Alternator in These Easy Steps
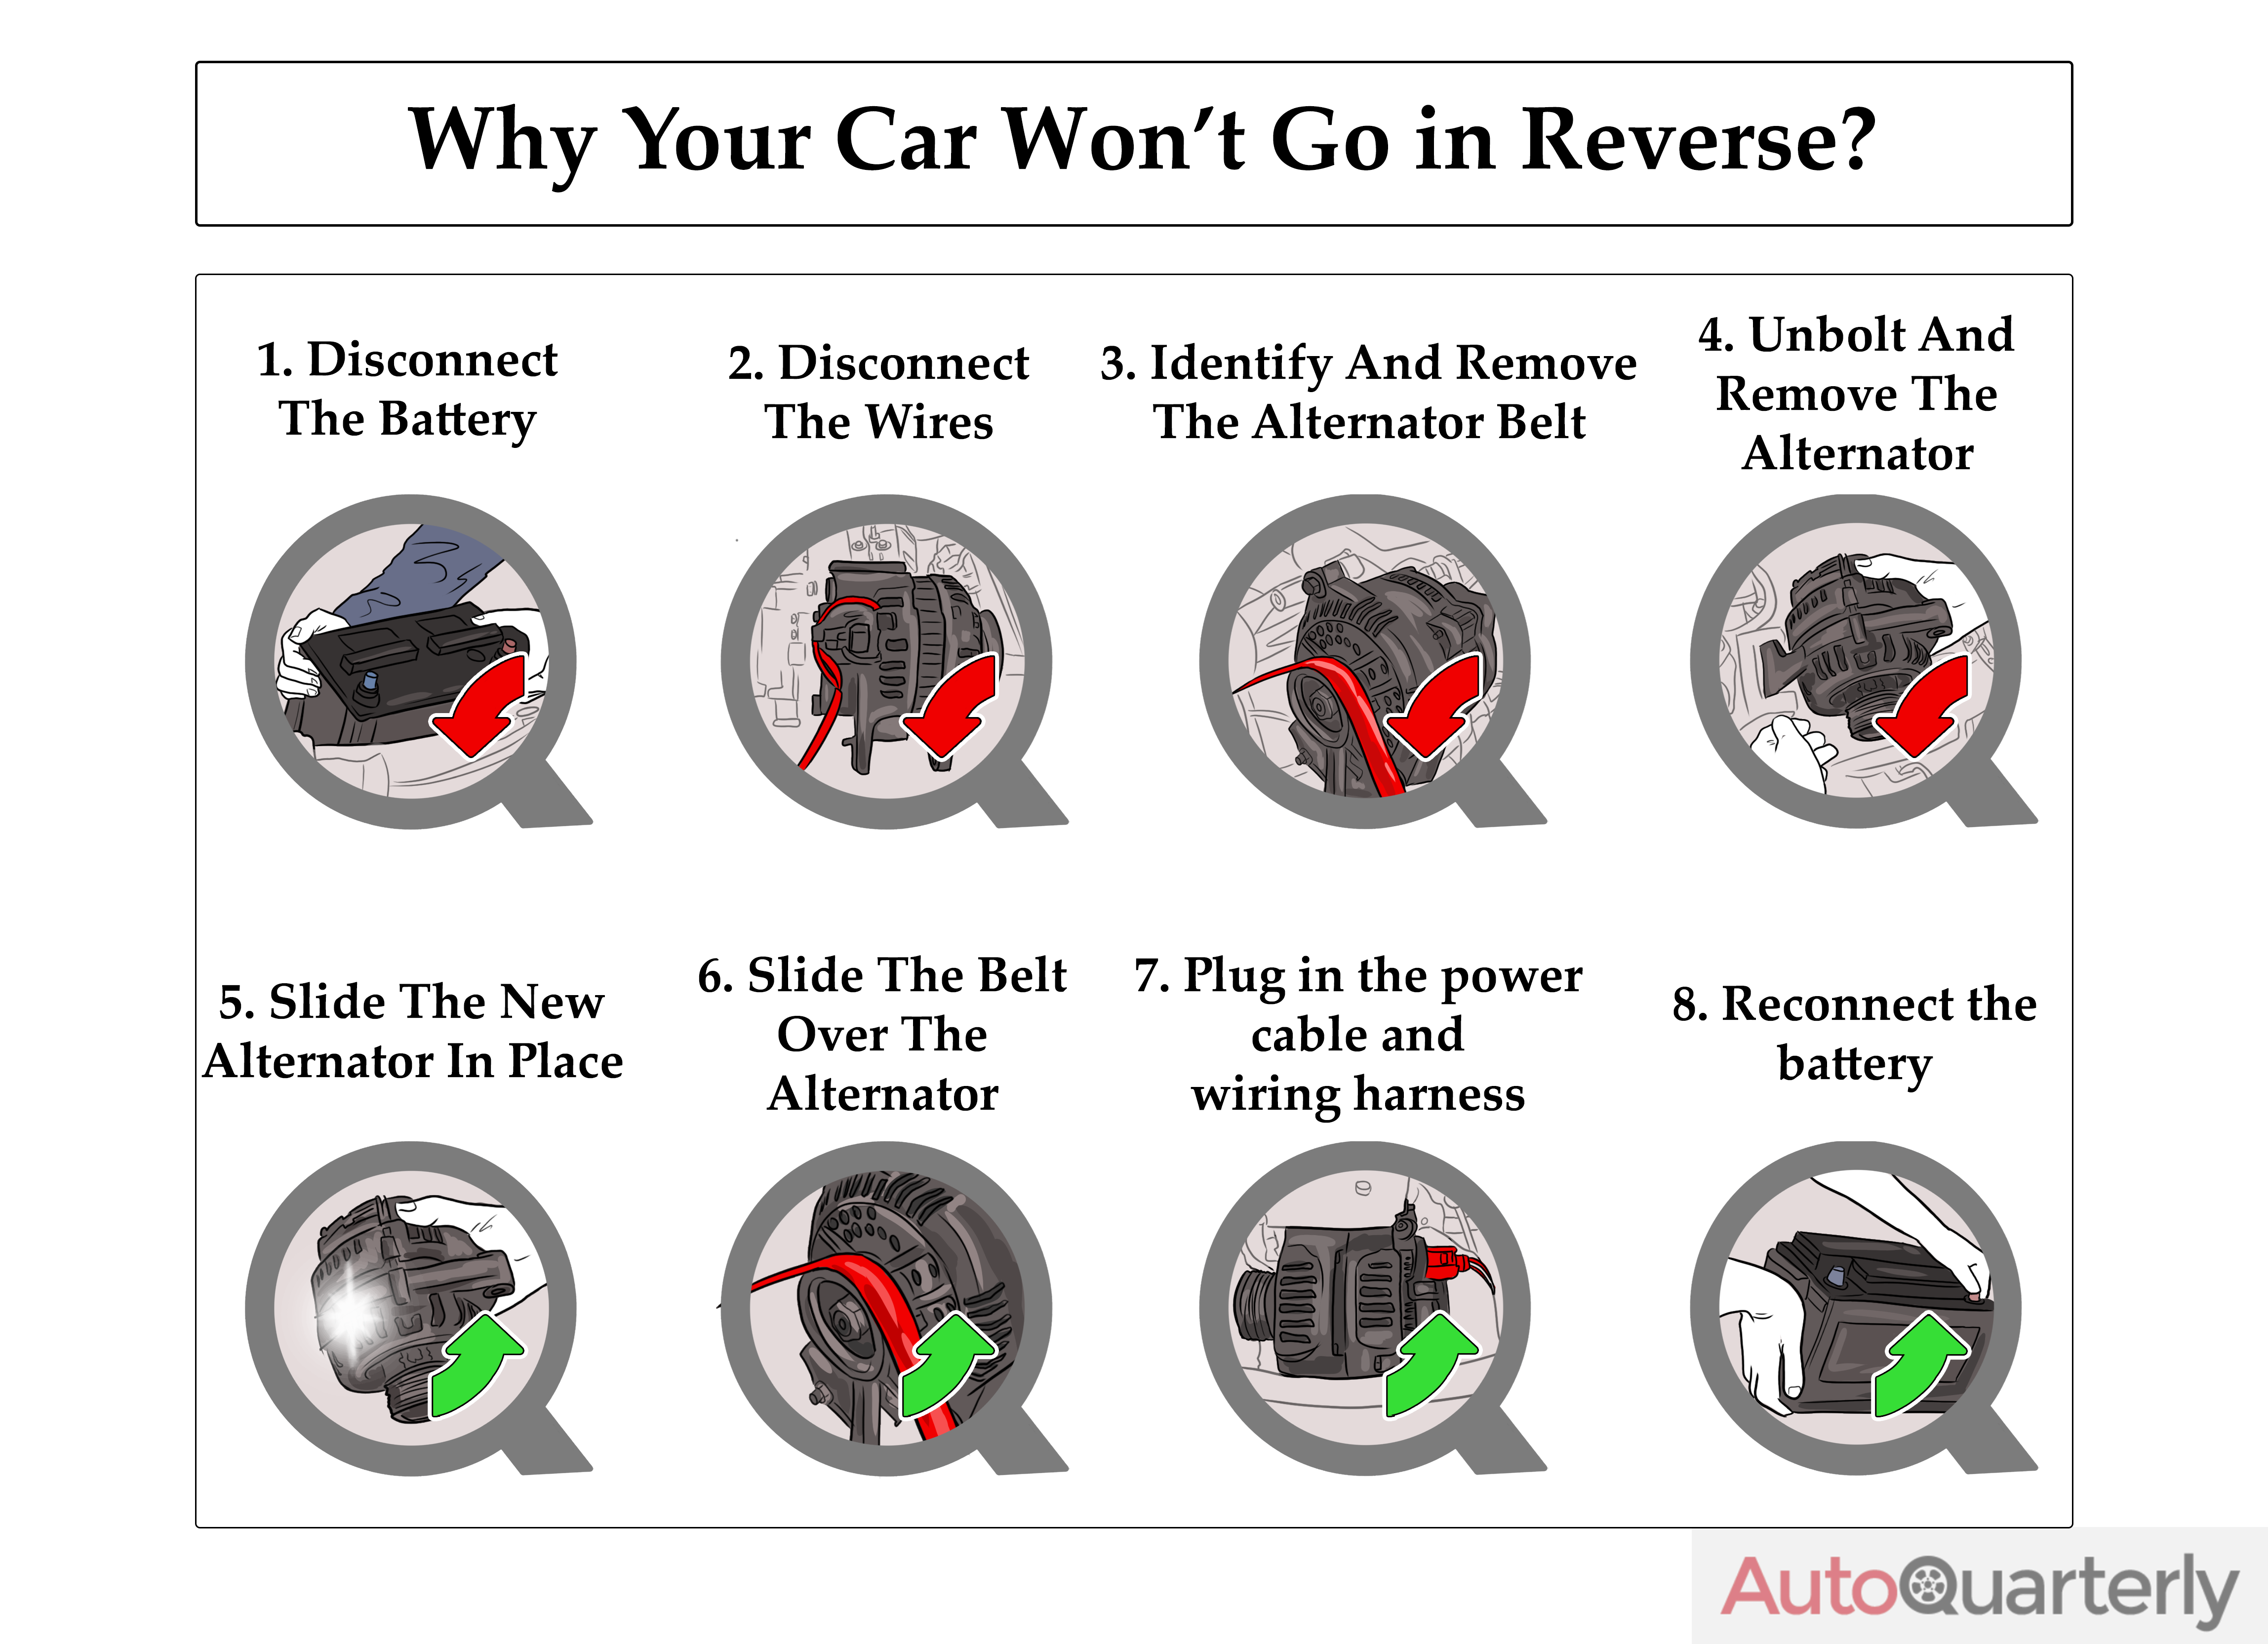
There are three phases of carrying out an alternator replacement: disconnecting, removing and finally installing a new alternator.
Please ensure your car is packed at a level surface as this makes it easier to work on it. For safety reasons, you also want to make sure it is in park mode.
Step 1: Disconnect the battery
It’s crucial to always disconnect the battery while working on the engine bay as a safety precaution. Changing an alternator is safe if done correctly, but problems can occur if the battery’s positive wire at the alternator comes in contact with any metal.
The sudden voltage surge may end up burning out a whole wire, which may destroy the wiring or even critical electronic components of your vehicle.
Find the negative terminal, loosen the bolt that fastens the cable on the socket, then carefully remove the cable from the terminal. You don’t have to disconnect the positive end.
Step 2: Disconnect the wires
There are two main cables attached to the alternator—the main power cable and the cable that connects to the harness.
The main power cable is thick and runs away from the battery. You’ll need an open-ended wrench or ratchet to unscrew the bolt that holds it in place. Be careful to store the bolt somewhere safe as you’ll need it after installing the new alternator.
Use your hands to unclip the wiring harness, which can be recognized as the only other cable that heads to the alternator. You can normally use a flat head or Phillips-head screwdriver, but be careful not to break the plastic.
Step 3: Identify and remove the alternator belt from the pulley
Take some time and examine whether the belt that runs in your car’s alternator is a serpentine belt or v-belt. While a serpentine belt is somewhat thin with ribs on the underside, a v-belt is just that—v-shaped.
A serpentine belt is always accompanied by an automatic belt tensioner. It keeps the belt tight using a spring. Be careful when loosening the belt tensioner as you may get injured if the spring snaps back.
In some cars, you’ll need to turn a bolt using a wrench or ratchet to decrease or increase the rod size in order to loosen the belt tensioner.
Before removing the serpentine belt, you want to either make a drawing or take a picture of how the belt is routed to use as reference when installing the new alternator.
A v-belt is not usually accompanied by an automatic belt tensioner. To remove it, simply loosen the adjustment bolt and pivot bolt located at the alternator’s support bracket. Then relieve tension on the v-belt by swinging the alternator inwards and finally sliding the belt off.
Whether dealing with a serpentine or v-belt, examine the belt and replace it if it’s cracked, worn, or glazed.
Step 4: Unbolt and remove the alternator
Locate the two or four bolts (depending on the model of the car) that fasten the alternator to the engine and loosen them. You might need to wiggle the alternator a bit for it to come off.
Pro Tip: Before buying a new alternator, it’s wise to get the old one tested just to ascertain that’s where the problem lies. Sometimes the problem could be loose wiring connectors, a voltage regulator that is faulty or a wiring problem. Most auto-parts stores will test alternators for free using an alternator bench tester.
Once the alternator is off the engine bay, compare it with the new one just to ensure the mounting holes and wire terminals are in the same place. You also want to ensure they are the same size, otherwise the new alternator will not fit in the engine bay.
Step 5: Slide the new alternator in place
You’ll have to wiggle the new alternator while installing it to ensure it fits and that all the bolt holes align. The new alternator should get free passage and not sit on any cables, as they may get destroyed due to its weight.
Make sure the belt is also out of place while installing the new alternator to prevent any damage.
Insert the bolts. If your car has a v-belt that doesn’t have a belt tensioner, don’t tighten the bolts fully, as you’ll need to rotate the alternator to tighten the belt. If it’s a serpentine belt with an automatic belt tensioner, then go ahead and completely tighten the bolts.
Step 6: Slide the belt over the alternator
You can either use a new belt or reuse the old belt, depending on its condition.
Remember the diagram you drew or the digital photo you took? That comes in handy here.
Follow the model and reattach the belt, ensuring it goes around all the necessary accessories.
If your car doesn’t have an automatic belt tensioner, tighten the belt using a pry bar by applying pressure on the alternator. Go ahead and tighten the bolts.
Step 7: Plug in the power cable and wiring harness
Use the bolt that holds the power cable to the alternator in place to connect it to the new alternator. Ensure the power cable is firmly attached to the alternator. Clip back the wiring harness onto the new alternator.
Step 8: Reconnect the battery
The final step is to plug back the power cable on the negative terminal of the battery. Ensure it is firmly held in place to avoid shaking while driving.
Final Thoughts
Doing an alternator replacement is pretty straightforward. You only need a few tools, a bit of patience and just a few hours.
You can always get a helping hand, especially when removing the belt if it gets confusing. Replacing an alternator isn’t an incredibly difficult procedure, but if you’re unsure it’s always best to get professional help. But, if you’re looking to DIY it, the repair shouldn’t give you too much trouble. It’s an interesting way to get off your comfort zone and do something exciting—while saving a few bucks, too!