Regularly bleeding your brakes and replacing the fluid is an important part of maintaining any vehicle. It’s also something that many of us routinely neglect. Trips to the mechanic are expensive, and working on your own car can be an intimidating prospect.
Thankfully, bleeding your own brakes isn’t as difficult as it sounds. Providing you pay close attention and follow this guide carefully, the process is relatively simple.
Why Do I Need to Bleed Brake Fluid?
When you press down on the brake, it releases fluid from the master cylinder into the brake lines. This puts pressure on the brake pads, which squeezes your brake discs and causes you to slow down. That pressure also causes the brake fluid to get hot, especially if you’re braking hard.
Over time, repeatedly heating the brake fluid like this causes it to break down and lose its resistance to water. Letting water get into your brake fluid will eventually cause corrosion and lasting damage to your brake system. This is one of the main reasons why you should try and bleed your brakes every year or two and refresh the fluid which has degraded.
Bleeding brake fluid is also a very common way to combat “spongy” brakes. Over time, small bubbles of air will get trapped in the brake fluid and they will compress together to form an air pocket.
This pocket will create some resistance in the brake fluid and make your brakes feel less responsive, like someone snuck a small sponge under your brake pedal. Bleeding replaces the fluid and its air pockets, leading to brakes that feel more responsive.
What Do I Need to Get Started?
To bleed your own brakes, you’ll need:
- A box end wrench
- A bleeding tool.
- 2-3 8oz cans of the correct brake fluid (see below)
- Someone to help you
- A pair of rubber gloves
- To pay careful attention to this guide. Bleeding your brakes isn’t hard if you do it right, but it does require you to follow instructions carefully. If you don’t feel comfortable doing that, you may be better off going to a mechanic.
You can find out what type of fluid your vehicle uses from the owner’s manual. The different types of brake fluid don’t mix very well so it’s important not to add multiple types of fluid to your brakes.
Whilst we’re talking about fluid, the reason you’re wearing gloves is because brake fluid is corrosive. It can damage your skin and other surfaces if it’s allowed to make contact with them. If you spill any brake fluid, you should clean it up before continuing on with the process.
I Want to Make My Own Bleeding Tool
In general, we don’t recommend that you do this. Bleeding tools are very cheap and are custom built for a single purpose. They fit snugly in bleeding valves, release pressure effectively and rarely leak fluid. They’re generally more efficient and reliable than anything you can patch together from tubing and an old Fanta bottle.
How Do I Bleed Brake Fluid?
- Start by getting your vehicle jacked up on level ground. Your garage or a flat driveway are both perfect spots. Make sure the vehicle is properly secured with jack stands. You’ll need to get under the car to bleed your brakes so it’s very important to ensure the vehicle is securely jacked up.
- Once the vehicle is jacked up, remove all four of the wheels. Have your helper climb into the driver’s seat and brief them. When you signal, they’ll need to push all the way down on the brake pedal, then continue to apply steady pressure. When you give a second signal, they can lift their foot off the pedal.
- Next, you’ll need to return to the owner’s manual. Look for the manufacturer’s specifications to find the order that your brakes should be bled in and follow it. Draining the brakes out of order can lead to older fluid staying in the system.
- Open the hood of the car and locate the master cylinder. It’s probably going to be covered in a decent layer of dust and dirt. Take a cloth and wipe it down: we don’t want any of that grime getting into our clean brake fluid when we open the cap.
- With the top of the cylinder and the cap clean, remove the cap. Then take your bleeding tool and use it to siphon out most of the old fluid. Don’t completely empty the cylinder.
- Drain most of the old fluid out of the bleeding tool and dispose of it. You should leave enough fluid in the tool to ensure that the end of the hose that sits in the bottle is submerged.
- Refill the master cylinder with fresh brake fluid and place the cap back on, without screwing it tight.
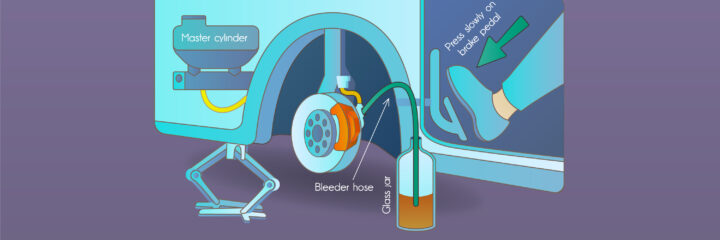
- Find your first bleeder valve. It’s usually on the back of the brake, at the top. Remove the cap and place your wrench on the valve. Then, place the hose of the bleeder tool into the valve. Make sure that the bottle is underneath the hose at this point.
- Turn the wrench to open the valve. If it’s really stiff, don’t try to force it. That’s more likely to damage the valve than it is to help you. If it’s stuck, give it a good spray with a penetrating oil, leave it for 20 minutes and then come back. If you still can’t open it, give it another spray and come back in 30 minutes. Breaking the valve here will require you to take the car in to a mechanic, so be patient!
- Once the valve is opened, you’ll see fluid start to flow into the hose.
- Ask your helper inside the car to push all the way down on the brake pedal. They should apply a slow but steady pressure. This will help push fluid through the house. After a few seconds, you should close the valve, then signal to your helper to lift their foot.
- Repeat the process until the brake fluid is the same color as the fluid you added to the master cylinder and there is no air in the hose. Be sure to close the bleeder valve each time before your helper lets their foot off the brake.
- If you’re having trouble bleeding all of the fluid, you can have your helper in the car build pressure in the brakes. To do this, have them pump the brake pedal for a few seconds until they feel a good amount of resistance underfoot. Once that happens, they should keep their foot on the break and signal to you.
- Open the bleeder valve a small amount and fluid will be pushed down the tube. They’ll feel the resistance dropping and the pedal heading towards the car’s floor. Just before the pedal touches the floor, your helper should signal to you and you should close the valve.
- Be sure to check the master cylinder after doing this, especially if you’re bleeding your 3rd or 4th brake. You must not allow the cylinder to run dry or too close to empty, or air will be pushed into your brake fluid.
- Once the fluid is the same color as the fluid you added to the master cylinder and there is no air in the hose, close the valve. Then, remove the tool and let the excess fluid travel down the hose into the bottle. Put the cap back on the valve.
- Refill the master cylinder, and move on to the next brake. Ensure that the bleeding tool isn’t too full of fluid to complete another bleed. If you need to drain it, once again ensure that the end of the hose that sits in the bottle is submerged.
- Once you’ve repeated this process on all of your brake lines, fill the master cylinder to the fill line. Tighten the cap.
- Inspect all of your bleeder valves to ensure that they’re sufficiently tightened.
- Take it for a quick test drive and check that your brakes are functionally correctly.
- Congratulations, you now know how to bleed brakes!


