Although we adore cruising around America in our RVs, there’s no denying the lifestyle comes with its fair share of challenges. Life on the road means a multitude of menial tasks: finding a spot to pull up for the night, filling the water tank, emptying the toilet, and keeping the kids entertained on those insanely long interstate trips.
But there’s one daily challenge to RV life that makes everything else look easy, especially for the newcomer who feels a tad nervous behind the wheel: backing up a big rig.
While reversing a normal-sized car is easy, the task becomes significantly more stressful when you’re operating a long vehicle like an RV. And should your mobile home of choice span 20 feet or more—as larger RVs and trailers do—then reversing can become downright dangerous.
Unless that is, you enlist the help of an RV backup camera to guide the way.
Also known as RV reversing cameras, these nifty little units make parking easier, safer, and less stressful, thus improving day to day life on the road.
And to help you pick out the perfect option for you, we’ve put together an in-depth RV Backup Camera Buyer’s Guide and reviewed the top 10 models on the market.
- What to Consider When Buying an RV Backup Camera
- Top 10 Best RV Backup Cameras 2026
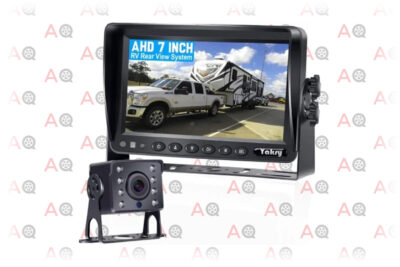
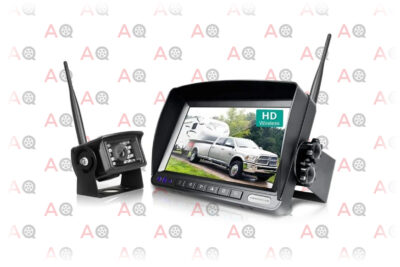
- 1. Best Overall Camera: Yakry Backup Camera
- 2. Best Budget Camera: LeeKooLuu LK3 HD
- 3. Best Premium Camera: Furrion Vision S Sharkfin Camera
- 4. Best for Small Rigs: Rohent R9 Wireless Backup Camera
- 5. Best for Situational Awareness: eRapta Backup Camera 2.0
- 6. Best for an Easy Install: AMTIFO A7 Wireless Backup Camera
- 7. Best for Off-Roading: 4Ucam Digital Wireless Camera
- 8. Best Resolution: ZEROXCLUB Backup Camera System Kit
- 9. Best Screen: Fookoo Ⅱ HD 9”
- 10. Best for Recording: Haloview MC7108
- RV Backup Cameras Buyer’s Guide
- The Benefits of an RV Backup Camera
- Wired Versus Wireless RV Backup Cameras
- What to Consider With the Display Screen
- What to Consider With the Camera
- Using an Existing Screen for Your Backup Camera
- Purchasing a Camera and Screen Separately
- Where to Mount the Screen
- Where to Mount the Camera
- Installing a Wired RV Backup Camera
- Fixing an RV Backup Camera
- RV Backup Camera FAQS
- Are RV Backup Cameras Worth It?
- Which Is Better Wired or Wireless Backup Camera?
- Do Wireless Backup Cameras Work Well?
- How Much Does It Cost to Install a Backup Camera?
- Can I Leave My Backup Camera on All the Time?
- Where Should I Mount My Rear-View Camera?
- What Year Did Cars Get Backup Cameras?
- How Long Do Backup Cameras Last?
- RV Backup Cameras: Final Thoughts
What to Consider When Buying an RV Backup Camera
Before we get stuck into our reviews, you must first wrap your head around the top features to consider. Without a solid understanding of the different functions and options available, you won’t have the expertise to purchase the perfect model for your needs.
Keep the following seven factors in mind when shopping for a reverse camera to use on your RV.
Wired or Wireless
The first thing you need to consider is whether you want to go wired or wireless. Wired systems perform better and aren’t prone to signal interference. However, the installation process is complex, which may mean enlisting professional help for a significant extra expense. Wireless systems are easy enough for the layman to install but have limited range and spotty reception.
Display Size and Resolution
Most RV backup cameras come with an LCD screen so you can monitor what lies directly behind you. The higher the screen size and resolution, the better the image will be, although it’ll add more to the price. At a minimum, aim for a 5-inch display with at least 600 horizontal pixels. Anything less than that is just too hard to see, especially in the heat of the moment as you’re backing up your rig.
Field of View
Also known as the viewing angle, field of view refers to how much you can see behind your vehicle. We measure the field of view in degrees, and the higher the number, the more you can see. Smaller vehicles reversed into a spacious parking spot might only require a field of view of 90 degrees or so. Big rigs with large blind spots, however, would benefit from a field of view of 120 degrees or more.
Weather Resistance
RV backup cameras are built to withstand the rigors of Mother Nature. But the key consideration is: to what degree? RV reverse cameras typically come with either an IPX6 or IPX7 weather-resistant rating, both of which provide adequate protection in adverse conditions.
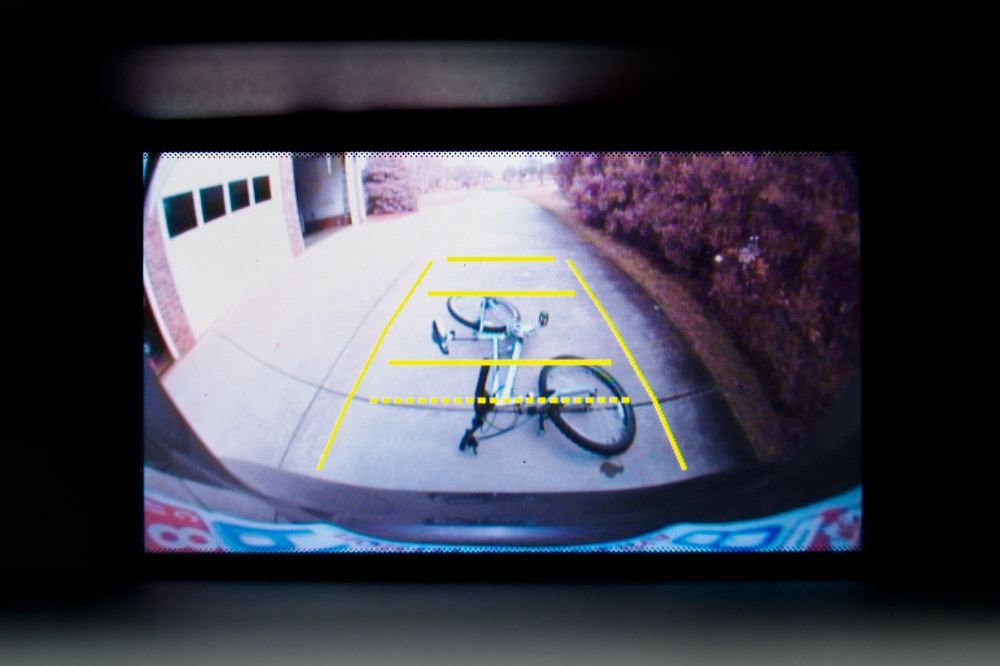
Grid Lines
Modern reverse cameras will display gridlines on the screen, which gives the driver a precise picture of what lies in their path. This nifty feature not only lets you see what’s behind you, it’ll help you master your reverse parking as well. Gridlines are either on permanently or turned on via a button on the display unit.
Night Vision
Although a seasoned RVer aims to hit the campsite before sundown, there will occasionally be times you need to back your rig up in the dark. Rather than relying on your reversing lights, most modern backup cameras have infrared LED lights to make the process a whole lot easier. And the more LEDs, the better you’ll be able to see in the dark.
Budget
We’ve all got different budgets to work with, so it’s crucial you find the best possible system that falls within your price range. Be sure to factor in the installation cost if you opt for a wired system, which could work out more expensive than the camera kit itself. And if you’re tempted to opt for the cheapest device possible, be aware that you’ll have to suffer through interference issues and poor screen resolution, which could cause an accident.
With those key factors in mind, let’s look at some of the top backup cameras available for your RV.
| Product | Wired or Wireless | Display | Field of View | Weather Resistance Rating | Camera mounting | Night Vision | Rating |
|---|---|---|---|---|---|---|---|
| Yakry Backup Camera | Wired | 7-inch screen / 1024×768 pixels | 150 degrees | IP68 | Back end | 18 Infrared lights | 5 |
| LeeKooLuu LK3 HD | Wired | 4.3-inch LCD / 1080p | 149 degrees | IP 69 | License plate | 6 LEDs | 5 |
| Furrion Vision S Sharkfin Camera | Wireless | 5-inch screen / 720 x 480 | 120 degrees | IP65 | Back end | Infrared | 5 |
| Rohent R9 Wireless Backup Camera | Wireless | 1080p | 150 degrees | IP69K | Back end | 12 LEDs | 4.5 |
| eRapta Backup Camera 2.0 | Wired | 7-inch screen | 360 degrees | Every side of the RV | 18 infrared lights | 4.5 | |
| AMTIFO A7 Wireless Backup Camera | Wireless | 7-inch LCD / 1080P | 150 degrees | Back end | No | 4.5 | |
| 4Ucam Digital Wireless Camera | Wireless | 7-inch LCD / 800 x 480 pixels | 130 degrees | IP66 | Back end | Infrared with 11 LEDs | 4 |
| ZEROXCLUB Backup Camera System Kit | Wired | 7-inch LCD / 1280 x 720 | 140 degrees | IP69 | Back end | 18 infrared LEDs | 4 |
| Fookoo Ⅱ HD 9” | Wired | 9-inch LCD / 1920×1080 | 170 degrees | IP69 | Back end | 18 infrared LEDs | 4 |
| Haloview MC7108 | Wireless | 7-inch LCD / 1024 x 600 pixels | 120 degrees | IP69K | Back end | Infrared | 3.5 |
Top 10 Best RV Backup Cameras 2026
1. Best Overall Camera: Yakry Backup Camera
Editor’s Rating:
Quick Facts:
- Wired or Wireless: Wired
- Display: 7-inch screen / 1024×768 pixels
- Field of View: 150 degrees
- Weather Resistance Rating: IP68
- Camera mounting: Back end
- Night Vision: 18 Infrared lights
If you’re looking for a well-priced reversing camera crammed full of cool features, then this tidy unit from Yakry is well worth a look.
Coming in at well under a hundred bucks a pop, this backup camera is several times cheaper than some of the premium options on our list. But that doesn’t mean you’ll have to compromise on functionality, as the wired device has got all the essentials: 18 LED lights, infrared technology, and IP68 waterproofing—to name a few.
The stats on this hardwired unit are pretty impressive, too. With a generous 150 degree viewing angle on the camera and 1024×768 pixels on the 7-inch screen, you won’t have any trouble seeing the finer details. We quite like the functionality here as you can toggle guidelines on or off and switch the camera between reverse only or always on.
If you fancy adding on a second camera, rest assured the unit is designed to run two in unison, and the display has the option of running in split-screen.
Setting the system up is relatively easy for a hardwired device, not least because the manufacturer includes all the necessary cables and brackets in the box. If you’re going to attempt a DIY install, check out this YouTube video for detailed instructions.
Pros
- High resolution
- Large screen size
- Reasonable price
- Good functionality
- IR with 18 LEDs
Cons
- No second camera included
2. Best Budget Camera: LeeKooLuu LK3 HD
Editor’s Rating:
Quick Facts:
- Wired or Wireless: Wired
- Display: 4.3-inch LCD / 1080p
- Field of View: 149 degrees
- Weather Resistance Rating: IP 69
- Camera Mounting: License plate
- Night Vision: 6 LEDs
With all the pricey add-ons you’ve already bought for your RV—think solar, batteries, signal boosters, TV antennas, and so on—chances are your bank account is starting to look a little slim. So when it comes time to fork out for yet another fancy widget, we would understand if you felt a little reluctant to get the best money can buy.
The good news is you don’t have to because low-end RV backup cameras can work surprisingly well. This uber-cheap option from LeeKooLuu is the most inexpensive system on our list, yet the picture clarity is remarkably good thanks to its outstanding 1080p display. Granted, at 4.3 inches, the screen is substantially smaller than most. But if you’ve got good eyesight, there’s no reason to let that turn you off.
Another neat bonus is the unit comes with 6 LED lights for extra illumination at night, plus a generous 149-degree field of view—not bad for a budget system.
The wired device taps into your reverse lights, meaning it’ll automatically turn on as you start backing out. It is possible to keep the unit running while driving as well—simply plug the 12V charger into the cigarette lighter outlet, and you’re good to go.
Note that this is a license plate mount, so you’ll need to install it down low and won’t achieve the ideal angle. And while the product works wonderfully on Class B RVs and vans, it’s far from ideal for bigger RVs, including trailers.
Pros
- Super cheap
- 1080p screen
- 149-degree field of view
- LED lights for illumination
Cons
- Must install in the license plate
- Not good for big RVs
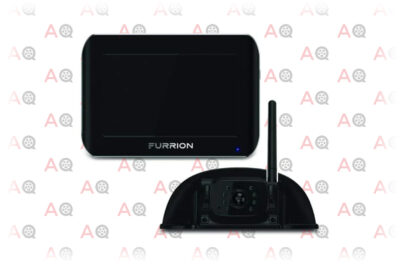
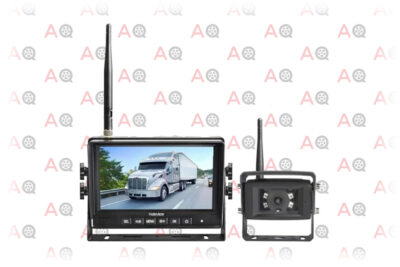
Editor’s Rating:
Quick Facts:
- Wired or Wireless: Wireless
- Display: 5-inch screen / 720 x 480
- Field of View: 120 degrees
- Weather Resistance Rating: IP65
- Camera Mounting: Back end
- Night Vision: Infrared
RVers on the hunt for the best possible wireless system on the market can’t go wrong with the Vision S, a high-performance wireless powerhouse that rivals its hardwired counterparts.
While most wireless systems suffer significantly from poor signal quality due to slow transfer speed, the Vision S transmits data at a lightning-fast rate. Specifically, the top-of-the-range Vision S transmitter and receiver work at a whopping 2.4GHz—we’d hazard a guess the S here stands for speed.
Furthermore, the unit comes with an in-built digital locking feature that allows the transmitter and receiver to communicate exclusively with one other. In a nutshell, that means no more interference from random Wi-Fi, Bluetooth, and other types of wireless tech.
Another major downside with other wireless cameras is the limited range, which means they don’t perform well on big rigs and travel trailers. The Vision S, on the other hand, sports an impressive 50-foot range at high speed or almost 500 feet while parked in an open field, which is more than enough for any kind of RV.
Aside from its optimized transfer speed and reliability, one cool feature we love about this product is the microphone and motion detection device that comes with the camera. Should a vehicle tailgate too close behind you, the camera will automatically engage so you can see exactly what’s going on.
If needed, you can add up to two more cameras and display them simultaneously on the 5-inch screen. It does feel a wee bit crowded with three cameras on the stock-standard screen, though, so if you’re adding new cameras, we recommend upgrading to the 7-inch model.
We won’t deny the fact this product costs a pretty penny. But for the driver of a long RV, the convenience and cost savings of not having to install a wired system could make the investment worthwhile.
Pros
- High 2.4GHz transfer speed
- Digital lock eliminates interference
- 50-foot wireless range for long RVs
- Microphone with automatic sound activation
- Option to add on two extras cameras
Cons
- Extremely expensive
4. Best for Small Rigs: Rohent R9 Wireless Backup Camera
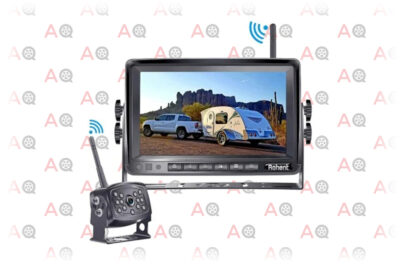
Editor’s Rating:
Quick Facts:
- Wired or Wireless: Wireless
- Display: 1080p
- Field of View: 150 degrees
- Weather Resistance Rating: IP69K
- Camera Mounting: Back end
- Night vision: 12 LEDs
Rohent offers an excellent all-round option with the HD 1080p, a superb wireless system that doesn’t suffer too badly from interference or signal loss.
Like other wireless backup cameras, this option is exceptionally easy to install—simply drill in the camera, hook up the antenna to the power supply, and let the unit work its magic.
One thing we love about this unit is the resolution, which runs at a crystal clear 1080p at high definition and outperforms other wireless options at this price range. You’ll also get 12 LEDs on the infrared light to ensure you can see clearly what lies behind you in less than ideal conditions.
Gridlines come standard, and this latest version gives you the flexibility to turn them on and off as you please. And to help fine-tune the gridlines to perfectly suit the size of your RV, there’s an option to adjust their width and length—we wish more devices had this feature because the in-default gridlines on many other cameras often aren’t quite right.
You can include another camera on the license plate if you wish, and as this is the 7-inch version, you’ll have ample screen real estate for simultaneous monitoring.
If you’ve got a big rig or extended trailer, be aware that this model isn’t suitable for RVs over 45 feet.
Pros
- High-performance wireless camera
- Reasonably priced
- 12 LED lights on the infrared camera
- Adjustable parking lines
- Option to add another camera
Cons
- Not suitable for RVs over 45 feet
5. Best for Situational Awareness: eRapta Backup Camera 2.0
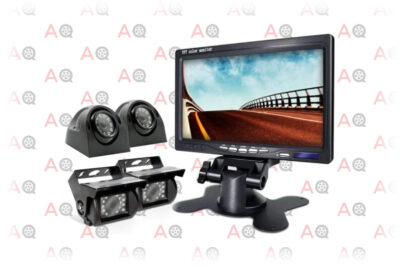
Editor’s Rating:
Quick Facts:
- Wired or Wireless: Wired
- Display: 7-inch screen
- Field of View: 360 degrees
- Camera Mounting: Every side of the RV
- Night Vision: 18 infrared lights
Why have just one camera on your RV when you can have four?
The eRapta Backup Camera 2.0 allows you to install four high-quality wired cameras on every side of your RV, effectively affording you a 360-degree view of everything around you. The unique setup is ideal for RVers who want maximum situational awareness while on the road by eliminating every single blind spot from their rig. And to get that full 360-degree feeling, you can rotate and mirror each camera angle on the display as you please.
Of course, with four cameras showing at once on a humble 7-inch screen, the display is going to start feeling a little crowded. But the beauty of this setup is that when you start reversing, it automatically full screens the backup camera so you can clearly see everything that lies behind you.
Now, with four separate cameras to install and wire up, this one will take a bit of effort to install. Nonetheless, it’ll be well worth it for those sweeping 360-degree views, especially for drivers who feel a tad nervous when changing lanes.
The unit runs on either 12V or 24V, so you can rest assured it’ll work on your RV.
Pros
- Four separate cameras
- 360-degree field of view
- Automatic switch to reverse
- Works on 12V or 24V
- Great for lane changes
Cons
- Screen looks crowded with four simultaneous cameras
6. Best for an Easy Install: AMTIFO A7 Wireless Backup Camera
Editor’s Rating:
Quick Facts:
- Wired or Wireless: Wireless
- Display: 7-inch LCD / 1080P
- Field of View: 150
- Weather Resistance Rating:
- Camera Mounting: Back end
- Night Vision: No
Boasting a great big 7-inch screen and an impressive 50 foot, AMTIFO offers a respectable wireless backup camera that won’t break the bank.
The thing we love most about this model is its brilliant screen, which is bigger than most and looks pristine with a 1080P resolution. And that makes it so much easier to see exactly what’s going on out the back, including the tiny little details that smaller, more pixelated screens might miss.
Another big plus is the product is super easy to install. You can even purchase a suction cup add-on if you’d rather not drill into the dash to install the display.
Functionality is rather impressive here, too, as the user can manually switch between having it on all the time or only for reversing. Guidelines are also quite simple to turn on and off at the press of a button.
Weather resistance wise, it’s got an IP69 rating, which is all you’ll ever need. And should you fancy adding another camera to the mix, you can slap on a license plate camera, which is sold separately.
On the downside, the overseas-based AMTIFO company isn’t renowned for its spectacular customer service. On the rare chance that something does go wrong, you might be left to figure it out on your own. There’s also no night vision, so give this one a miss if you plan on frequently using your RV after dark.
Pros
- Easy to install
- Big HD screen
- Can toggle camera and guidelines on / off
- Strong waterproof rating
Cons
- No night vision
- Poor customer support
7. Best for Off-Roading: 4Ucam Digital Wireless Camera
Editor’s Rating:
Quick Facts:
- Wired or Wireless: Wireless
- Display: 7-inch LCD / 800 x 480 pixels
- Field of View: 130 degrees
- Weather Resistance Rating: IP66
- Camera Mounting: Back end
- Night Vision: Infrared with 11 LEDs
One for the off-road warriors, 4Ucam is a heavy-duty beast designed to hold strong through even the most rugged terrain.
While other cameras may rattle, bounce, and ultimately break if you tackle too many bumpy dirt roads, this model is built to last. The unit comes with a durable aluminum alloy metal case that’s capable of withstanding a whopping 6.8G-force—that’s more shock resistance than you could ever need. What’s more, the camera clips onto your rig with a tough steel mounting bracket that won’t come loose any time soon (but don’t worry, it’s adjustable, so you can still find the ideal angle).
The wireless system works rather well, with little interference or static during regular use. Although the manufacturer claims a range of up to 100 feet, we really don’t recommend using this one on rigs over 50 feet as there’ll be too much signal loss at that range.
The downside to this formidable workhorse is the screen isn’t all that flash. With a mere 800 x 480 pixels, it doesn’t offer anywhere near the clarity as other options on our list. Nonetheless, if you value resilience over resolution, this tough-as-nails option could be right for you.
Pros
- Heavy-duty camera bracket for dirt roads
- Long-lasting product
- Wireless has minimal interference
- Withstand 6.8G-force
Cons
- Low-resolution screen
8. Best Resolution: ZEROXCLUB Backup Camera System Kit
Editor’s Rating:
Quick Facts:
- Wired or Wireless: Wired
- Display: 7-inch LCD / 1280 x 720
- Field of View: 140 degrees
- Weather Resistance Rating: IP69
- Camera Mounting: Back end
- Night Vision: 18 infrared LEDs
If you like the idea of a wired system but can’t stomach the thought of suffering through a complex install, this user-friendly product from ZEROXCLUB is worth a look. While most displays take a considerable amount of stuffing around to install the dash, with this unit, all you need to do is plug it into the 12-24V cigarette plug. Of course, you’ll still need to drill the camera into the back of the RV and run the wiring through to the reverse lights—there’s no getting out of that one.
One major draw of this model is the screen resolution, which far outperforms almost every other option on the market. With ZEROXCLUB, you get 600 horizontal lines on the display, which equates to 1280 x 720 effective pixels. And that kind of high-end resolution is on par with a modern laptop, giving you a crystal clear picture of precisely what’s happening behind your rig.
Aside from the screen, it’s a pretty decent model overall with respectable specs: 149-degree viewing angle, IP69 Waterproof rating, and 18 LED lights on the infrared.
It’s possible to wire the camera to run all the time, rather than only in reverse. However, once you hit 40mph or so, it’ll start cutting out from excess interference, despite the manufacturer claiming the wireless is suitable for 80mph or more. This little defect is hardly a deal-breaker but nice to know nonetheless.
Pros
- High resolution (1280 x 720)
- Easy to install
- Plugs into cigarette lighter on the dash
- Wide viewing angle
- Lots of IR LEDs
Cons
- Won’t operate at speeds over 40mph
9. Best Screen: Fookoo Ⅱ HD 9”
Editor’s Rating:
Quick Facts:
- Wired or Wireless: Wired
- Display: 9-inch LCD / 1920×1080
- Field of View: 170 degrees
- Weather Resistance Rating: IP69
- Camera Mounting: Back end
- Night Vision: 18 infrared LEDs
Whoever said “size doesn’t matter” clearly hasn’t tried backing up an RV while squinting at a pathetic, pint-sized screen. The Fookoo II proves once and for all that bigger is better with its enormous 9-inch screen, which is pretty much on par with your average tablet.
And the image is crystal clear, too, with sharp 1080P technology allowing for 1920 x 1080 pixels on the screen. Compared to some of the low-end reversing cameras on the market, this screen will make you feel like you’re watching a big-budget Hollywood film taking place right behind your rig.
Given the screen is so big, it should be capable of displaying two cameras at once, right? Wrong. For reasons unbeknownst to us, Fookoo has decided only to let you monitor one camera at a time, even though two different cameras are included in the deal.
With all that data being sent back and forth, a wireless system wouldn’t cut it. And that’s why Fookoo has gone wired on this premium product, so don’t expect an easy install. Nevertheless, if you were leaning towards a wired unit anyway, its oversized, ultra-high-resolution screen makes this a top option to consider.
It is possible to downsize to a cheaper, 7-inch version of the same device—but why would you when having a massive display is the main highlight here?
Another cool feature of the Fookoo II is the screen automatically adjusts the brightness to correspond with the ambient light, which helps cut down on glare. It also doubles as a recording device (kind of like a reverse dash cam), but it’s a bit fiddly to set it up so that it continuously backs up your data.
Pros
- Massive 9-inch screen
- Sharp 1920 x 1080 resolution
- Automatically adjust brightness
- Can use as a dashcam for the back
Cons
- Only display one camera at a time
- Saving recorded footage is laborious
10. Best for Recording: Haloview MC7108
Editor’s Rating:
Quick Facts:
- Wired or Wireless: Wireless
- Display: 7-inch LCD / 1024 x 600 pixels
- Field of View: 120 degrees
- Weather Resistance Rating: IP69K
- Camera Mounting: Back end
- Night Vision: Infrared
Worried about someone rear-ending your rig? You should be, because not only would that be extremely dangerous, but the hassle of filing an insurance claim is immense. The worst part, of course, is proving you were in the right—in our experience, the driver at fault always seems to claim you pulled out in front of them.
Now, if you’ve got a backup camera that records video onto a hard drive on your behalf, you’ll have all the evidence you need to get the insurance company to pay out. And that’s where the MC7108 from Haloview shines.
Granted, this isn’t the only backup camera to record video. The Fookoo II, for example, is just one competitor in the space. But the beautiful thing about the Haloview is how easy the whole process is. The system will automatically copy over old footage on your behalf, so all you need to do after an accident is stop using the device to save the evidence inside.
Apart from the recording feature, the Haloview is a rather unremarkable backup camera in our books. The lackluster 1024 x 600-pixel screen is grainy at the best of times, and the 120-degree field of view has plenty of room for improvement. We also feel the wireless technology here is a little too prone to interference, which ultimately ends in ugly static.
Still, if you want a continuous recording of the backend of your rig and aren’t too fussed about having the best possible specs, Haloview is a good option for you.
Pros
- Easy-to-use recording option
- Recording can save you hassle after an accident
- No need to manually save a recording
Cons
- Low resolution
- Mediocre field of view
- Wireless prone to interference
RV Backup Cameras Buyer’s Guide
There’s more to the humble RV backup camera than you might think. From the technical specifications to the installation process and putting the technology into action, there’s a lot to learn about this exciting piece of tech.
And that’s why we’ve put together this in-depth buyer’s guide, to give the backup camera novice (or expert) the necessary knowledge to purchase the most appropriate model for their needs.
The Benefits of an RV Backup Camera

Backup cameras typically cost several hundred dollars and can be a pain to install.
So are they worth the hassle?
In a word: yes. The RV backup camera entails a variety of important benefits, which we’ll outline below.
Stress-Free Reversing
Larger vehicles like RVs have a massive blind spot out the back, making moving in reverse nerve-wracking even under favorable conditions. For all you know, there could be a chair, a car, or campsite directly in your path. Having a backup camera installed in your RV makes it easy to see exactly what’s behind you, so you needn’t stress about running over anything.
And if you’re a nervous driver who’s new to operating a large vehicle, that extra peace of mind is a godsend.
Easier Parking
The bigger the vehicle, the harder it is to park. And even if you’re cruising about in a modest Class B RV, your rig is still going to be a good 15 feet long. Although you can use your mirrors to line up the perfect angle for a reverse park, it’s nigh on impossible to tell what’s going on at the back end due to the blind spot. Should you reverse back even an inch too far, you could crunch into the bumper of a pristine late-model Mercedes, and then you’d have plenty of explaining to do.
A backup camera will let you know precisely how close your rear bumper is to the bollard, car, or whatever else is right behind you. That way, you can easily pull off a daunting reverse park without having to worry about the big blind spot at the back.
Enhanced Safety
While backing into a car or reversing over a camping chair is embarrassing and potentially costly, it’s not that much of a big deal—that’s what insurance is for, after all. Backing over a child, on the other hand, could be a deadly mistake.
In the United States, back over accidents kill around 200 people per year and injure over 12,000. Many of the victims are children—if you’ve ever spent time at an RV park, you know kids run around unsupervised all the time.
As backup cameras allow the driver to see what’s directly behind them, the technology reduces the likelihood of a fatal accident by a significant degree. So much so, in fact, that the Department of Transportation mandated the inclusion of a backup camera in all new vehicles (including RVs) sold from May 2018.
So if you’re planning to purchase a late model or brand new RV, then you don’t need to worry about looking for a backup camera as it’ll already come installed in the rig.
Wired Versus Wireless RV Backup Cameras
The first thing you need to decide when looking at a new backup camera is whether you want wired or wireless. In this day and age, it’s fair to assume wireless would be your best bet. And while the technology may be the superior option for many of our everyday gizmos, that’s not necessarily the case with a reversing camera.
Wired RV Backup Cameras
As you’d assume, wired backup cameras have physical wiring that connects the camera to the display screen installed on your dash, from where it will draw enough power to operate (much like your AC, it only works when the engine is running).
Although perhaps a bit “old school,” wired reversing cameras are the option of choice for keen RVers who live in their rigs full time.
Wired Backup Camera Pros
- Improved Image Quality: The wiring that connects the camera to the display can transmit more information at a higher speed than a wireless setup. Therefore, these systems will deliver a superior image that’s never grainy or fuzzy.
- Enhanced Reliability: Wireless signals are susceptible to interference, whether it’s a physical barrier or a competing signal (Bluetooth, Wi-Fi, etc.). Adverse weather conditions like heavy rain or snow can also interfere with the signal, ultimately resulting in a subpar image.
- More Available Options: As wired backup cameras have been the preferred option for many years, there are a plethora of different options to choose from. And this abundance of choice makes it easier to find the perfect model for you.
Wired Backup Camera Cons
- Hard to Install: While a wireless system is simple to hook up, a wired one isn’t so easy. You’ll have to attach the display to your dash, hook into the dashboard power supply, and run wiring all the way to the camera on the back. Most RVers choose to enlist professional help.
- Expensive: As wired systems have superior quality cameras and screens, they tend to be more expensive than wireless systems. And unless you’re a DIY superstar, chances are you’ll need to pay an auto electrician to do the install, and these guys don’t come cheap.
- Tricky to Repair: If part of the wiring should break, you’ll need to pull all the wiring out to locate and reconnect the failed section. Although the process isn’t exceptionally difficult or time-consuming, it will usually require a trained professional.
If you think a wired camera is right for you, the Yakry is an excellent model to consider.
Wireless RV Backup Cameras
Rather than wiring cables through your RV, the wireless system transmits a signal from the camera to a receiver on your dash. Consequently, it’s far easier to install—DIY is definitely on the cards—but the signal may suffer due to interference and/or range issues.
Wireless Backup Camera Pros
- Simple Installation: Even the novice DIYer can install a wireless reversing camera themselves—the process takes a few minutes from start to finish and doesn’t require any special skills. Consequently, you’ll save money by not enlisting a professional for the install.
- Better Integration: Wireless technology is compatible with devices apart from your display. It’s possible, for example, to connect a wireless camera to your smartphone or an existing screen on your dash (which is sometimes possible with wired, but always more difficult).
- More Cost-Effective: Wireless backup cameras tend to be cheaper than wired models, usually because they come with inferior quality cameras and screens. Furthermore, the fact you can do a DIY install will further help reduce the total price.
Wireless Backup Camera Cons
- Low-Quality Images: Wireless technology transmits data at a far slower rate than wired. Therefore, a wireless camera will have an inferior resolution, making it difficult to discern the finer details.
- Interference Issues: Wireless technology is prone to interference, either from other wireless signals (say, Wi-Fi and Bluetooth) or adverse weather like rain and fog. When interference occurs, your display image may become fuzzy or grainy, at times almost impossible to see.
- Low Range: Wireless signals lose their strength after a certain distance, and the exact range depends on the quality of the transmitter and receiver. If you install a low-end wireless camera on the back of a long RV, then you’ll likely be unsatisfied with the results.
If you believe a wireless camera suits you best, then check out the the wireless offering from Furrion.
What to Consider With the Display Screen
Do you desire crystal clear clarity, or would you be happy with a grainy image if it’s going to save you cash?
Although the camera specifications do come into play, the main factor that affects the final image is the quality of the display. Be sure to consider the screen size and resolution when shopping for the ideal unit for you.
If you want a display to double as an entertainment system, you might consider opting for something bigger and with a better resolution. Always check to ensure your preferred product is compatible with the relevant entertainment platform.
Screen Size
Screen size varies from model to model and typically ranges from 4 to 9 inches diagonally. The larger the screen, the easier it is to see the necessary detail, so it’s worth investing in something with at least five inches.
Should you have poor eyesight or just like the look of a bigger screen, then there’s no harm in going for something a bit bigger.
Resolution
Resolution refers to the number of pixels on the screen, which ultimately affects the quality of the image. A high number of pixels will appear sharp and clear, while a screen with few pixels looks blurry and pixelated.
While you don’t necessarily need near-perfect image clarity when backing up an RV, you do at least want to ascertain what’s behind you. At a minimum, we recommend opting for a product with 800 horizontal pixels, although more is always better.
Aside from pixels, image resolution can also be affected by the wiring and transmission source. Interference from a wireless camera, for example, will have a detrimental effect on your image.
What to Consider With the Camera
The display is only part of the equation; you need to consider what you want out of the camera component too. RV backup cameras vary in terms of the field of view, night vision capability, and weather resistance rating.
Field of View
Sometimes referred to as the “viewing angle,” the field of view refers to the width of the camera angle, which we measure in degrees. In a regular car, a field of view of 90 degrees is adequate because that allows the driver to fill in the small blind spot.
On larger vehicles such as RVs, however, the blind spot at the back is massive. Thus, the driver needs as wider an angle as possible to determine what lies behind. At a minimum, we recommend purchasing a camera with a 120-degree field of view, although there’s certainly no harm in going even wider than that.
Weather Resistance
As your RV camera will sit snugly on the exterior of your rig, it’s going to have to withstand the elements on a day-to-day basis. The manufacturers know this, which is why they’ve constructed backup cameras with a tough IPX6 or IPX7 weather resistance rating.
- An IPX6 level of waterproofing means the camera will withstand massive streams of water hitting it from any angle, as you’d expect to occur during a storm.
- IPX7 offers even better resistance, capable of withstanding being submerged in as much as one meter of water for 30 minutes.
We certainly hope you wouldn’t fully submerge your RV underwater for a moment, let alone 30 minutes (if you did, you’d have bigger things to worry about than a camera). Therefore, the fact of the matter is that an IPX6 rating will be sufficient. Aim for the higher end, if possible, such as an IP69.
Night Vision
Some high-end RV backup cameras come with built-in night vision technology, which lets the driver see what’s behind them after dark.
Now, in reality, the feature probably isn’t as essential as it sounds, considering most RVers will pull up at a campsite long before the sun has set. Nonetheless, it’s a nifty little add-on to have, especially for small Class B RVers who tend to be more mobile after dark.
We can measure a night vision camera’s effectiveness by looking at the lux rating, which refers to the amount of visible light a camera can detect while still providing a reasonably clear picture. Lower lux ratings equate to better night vision—0.1 means the camera will see clearly under a full moon.
However, most modern models use infrared technology, which can detect a heat source in total darkness. These come with LED lights to help them function, and the more lights you have, the better.
Night vision is mostly used in wireless backup cameras; wired backup cameras tend to use the vehicle’s tailgate lights as the primary light source.
Using an Existing Screen for Your Backup Camera
Most RV backup cameras come in a package, where the display is sold together with the camera.
It is, however, possible to purchase a backup camera by itself—for example, the eRapta ERT01 — and then integrate it with an existing screen located on your dash. This option offers three key advantages:
- Save money as you don’t have to purchase a new screen
- Save space on your dash as you only need to have one screen
- Use your existing screen as an entertainment unit and reverse camera in one
If you decide to go down this route, you’ll need to double-check your existing display is compatible with your chosen new camera. Linking them up is pretty easy for a wireless camera, which can connect to most devices through Bluetooth. Wired cameras are more complex and often aren’t compatible with displays other than what comes in the box.
In either case, check the instruction manual of your existing display and your backup camera of choice to determine whether the two separate units will be compatible.
Purchasing a Camera and Screen Separately
While most backup cameras come with both a camera and a display, it is possible to separately purchase the two individual components.
The downside here is additional complexity—you need to ensure both units work properly together before hitting the “buy now” button. As you’re getting two separate parts from different manufacturers, the installation process will likely be more complex, and it could prove problematic to troubleshoot repairs.
So what’s the point, you may ask? This option allows you to use the precise camera and display unit you want in unison. But given the whole process is rather fiddly, we only recommend this path for advanced users with strong technical skills.
Where to Mount the Screen
An RV dash is relatively big, so it shouldn’t be all that difficult to find an appropriate place to install a screen.
Many RVers like to install the screen directly onto the horizontal surface of the dash using a vertical arm, either nailing it in or through an adhesive tape. You needn’t worry about the hot sun wreaking havoc on the screen because camera displays are specially built to withstand intense heat.
Do, however, be aware that a display located above the dash can suffer from glare. When the sun hits it at the right angle (or the wrong angle, rather), you won’t be able to see anything, and your flashy backup camera will be rendered useless.
One option is to install the screen on the dashboard, which often requires removing another component such as the factory stock radio system. Alternatively, some RVers prefer to switch out the rear-view mirror and replace it with a new one that includes a fancy in-built screen.
Where to Mount the Camera
Most RV backup cameras are installed on a bracket bolted into the back end of their rig. This simple installation option is fast and easy, plus it allows you to run the wiring through the RV with minimal fuss. Be sure to place the camera up as high as possible to achieve optimal depth perception.
If you’re worried an aftermarket backup camera could ruin the aesthetics of your rig, there are other options to consider. Some RVers do what’s called a “flush mount,” which is when you install the camera internally and drill little holes for it to peep out of. Another method is the license plate mount, where the camera is hidden away in the license plate frame where nobody can see it.
Many companies design cameras specifically for license plate use, and these are often installed in conjunction with backend mounted cameras to fill in potential blind spots.
As you’d expect, the latter two options are more complicated to install and would thus require more time and effort to pull off.
Installing a Wired RV Backup Camera
Although the precise process for installing an RV backup camera varies, you’ll likely need to complete these steps. We’re going to get pretty technical here, so get in touch with a professional instead if you’re not a confident and highly competent DIYer.
- Disconnect the starter battery on your RV
- Mark the spot where the camera cord will pass through the vehicle
- Check you won’t damage any cables or trimming before drilling
- Choose the appropriate size drill bit to bore a hole for the rubber grommet and wiring
- Drill the hole into the marked area of the exterior and place a grommet in to hide the rough edges
- Run the cables to the front of the car, preferably through the original wiring loom.
- Power up your camera by connecting it to either the cab or the reversing lights
- Link the positive and negative camera wires to the relevant light wires using a splice or a Posi-Tap connector
- Remove part of the plastic coating on the positive light wire with a wire stripper, split the bare copper section into two parts, and feed the positive camera wire into the hole, getting it in-between the copper wiring.
- Twist the positive camera wire around the light wire and secure the connection with electrical tape
- Follow the preceding two steps for the negative wire
Fixing an RV Backup Camera
RV backup cameras can stop functioning correctly for a whole host of reasons. The best way to set about fixing your device depends on what’s gone wrong.
Blurry Images
A blurry image is probably the result of a dirty lens, which is an easy fix. Dirt, dust, grime, and condensation can accumulate on your lens, making the picture quality degrade over time.
For condensation, you can simply wait until it dries off, which shouldn’t take long once the sun has come out. If dirt is the issue, then clean your lens gently using a microfiber towel. Don’t try and use any old cloth as you could scratch the delicate glass surface.
Static
If your display shows either black or white static, that’s probably an issue with a faulty connection. Examine your wiring to ensure everything is connected correctly and intact. If you do find a frayed section, either repair it or replace the entire cable.
The No Signal Message
If your screen displays the dreaded “no signal” message, then the issue is probably either a blown-out fuse or a broken wire. Consult your vehicle’s instruction manual to locate and replace the relevant fuse. If it hasn’t blown, carefully examine all you’re wiring to ensure no cables have snapped or frayed.
For a wireless system, the solution could be as simple as turning it on or off again. Failing that, check the fuses and any wiring in the display.
A Black Screen
If your display is entirely black and there aren’t any flickering lights on the unit, you could have blown a fuse or have a wiring issue. Review your fuse box and check your wiring to ensure everything is in good condition.
Should the screen be black, but some of the display lights turn on, then the issue probably lies in your camera. Check all the relevant camera connections and replace them if need be.
RV Backup Camera FAQS
Still looking to learn more about RV backup cameras? We admire your curiosity, and we’ve put together an in-depth FAQ especially for folks like you.
Are RV Backup Cameras Worth It?
Reversing in an RV can be challenging, especially for newcomers who are still learning the ropes. Rather than risk a nasty accident while reversing, an RV backup camera fills in the blind spot so you can see exactly what’s behind you.
Although they may be pricey and a pain to install, RV backup cameras are worth it, especially for keen travelers who spend a lot of time in their rigs.
Which Is Better Wired or Wireless Backup Camera?
A wired backup camera is superior because it allows for faster data transmission and doesn’t suffer from interference. As a result, you’ll enjoy a better quality and more reliable image on your display.
There is a big downside, though: wired backup cameras are complicated (read: expensive) to install.
Do Wireless Backup Cameras Work Well?
While some wireless backup cameras offer excellent performance with minimal interference, others do not.
Stick to our recommendations to find a high-performing wireless unit that won’t disappoint.
How Much Does It Cost to Install a Backup Camera?
The cost of installing a backup camera depends on the model in question.
The average wage for an auto electrician in America is around $75 per hour. A wireless backup camera should take under 15 minutes to install but count on paying the full $75 anyway (the good news is wireless is easy to DIY).
A wired system, on the other hand, could take a professional two or more hours to install.
Can I Leave My Backup Camera on All the Time?
Although it is possible to configure a backup camera to be on all the time (at least while driving, anyway), it depends on how you install the device.
Most people prefer to power the camera component from the reversing lights, making it turn on automatically whenever you chuck the car in reverse. But if you choose to use an alternative power source, the screen will be permanently switched on as you drive.
Where Should I Mount My Rear-View Camera?
Most RVers prefer to mount their cameras on the back end of the rig, placing it as high as possible to maximize the field of view. On RVs, license plate mountings are preferred as a second camera to complement the first.
Most car owners use a license plate camera as the primary camera because the angle is acceptable, and they bolt onto existing screws, so there’s no need to drill into the body of the car.
What Year Did Cars Get Backup Cameras?
Backup cameras became mandatory in all new cars (and RVs) sold in America in May 2018. Older cars are not currently required to retrofit a backup camera, although it is a good idea.
How Long Do Backup Cameras Last?
A backup camera’s shelf life varies depending on its quality, how often you drive, and the type of terrain you traverse—bumpy country roads aren’t great for backup cameras.
As a rule of thumb, however, you can expect your backup camera to last ten years or so.
RV Backup Cameras: Final Thoughts
If you’ve made it this far, you’re now a certified expert in the realm of backup cameras for an RV. And now that you’re a reversing camera know-it-all, the only thing left to do is find the perfect product from our top 10 list.
Once you’ve got a backup camera correctly installed in your rig, you’ll enjoy hassle-free reversing for years to come, and you won’t have to stress about accidentally reversing into a wall.