Most drivers have had their baptisms into the flat battery, and when it happened, they were found wanting. The thing that makes a flat battery such frustration is that it arises out of nowhere. One day, you start your car without any hiccups and the next day you have to phone in and explain why you are going to be late.
The other thing that makes a flat battery such a nuisance is that most people are unprepared for it. Either they don’t have jumper cables in their car, or they don’t know how to use the wires.
Here is a quick guide on how to use your jumper cables.
1. Positioning
This is probably the most overlooked aspect of jump-starting a car, and that is getting the two cars aligned in such a way that the cable reaches between the batteries. Just because your battery is situated on the right, doesn’t mean that the other car will also have the same orientation. Therefore, always check that you align the batteries as close to each other as possible. This will reduce your frustration significantly.
2. Terminal Check
Your jumper cables serve one purpose, and that is to provide a temporary circuit between your flat battery and a healthy battery. For this electrical current to flow, it needs to be connected without any isolating substance, blocking the flow of electricity. Therefore, it is of the utmost importance to make sure that the terminals (those two knobs where you connect the cables) are clean and free of any buildup. If you see a green substance that has formed over the terminal, you can clear it up with some cola. Just pour some cola on the terminals and watch the chemicals react and clear everything for you.
3. Polarity check
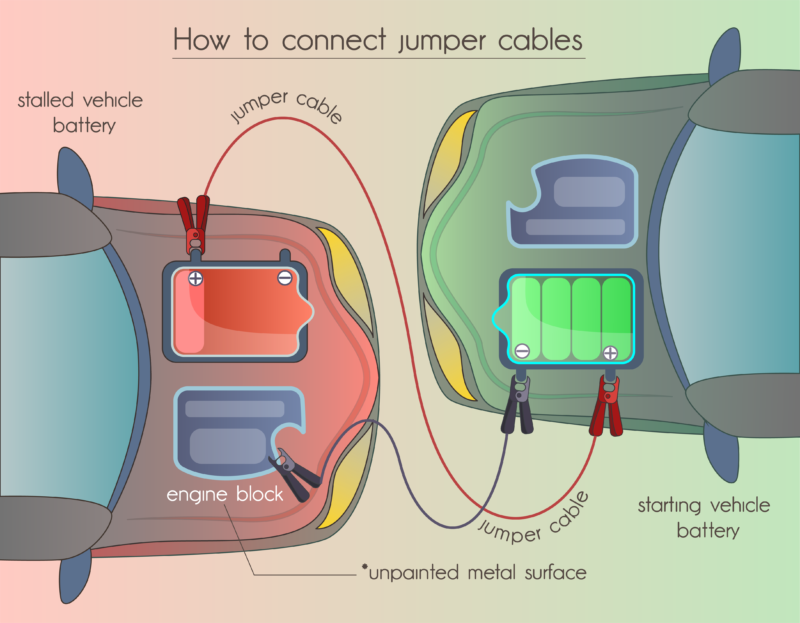
The central area where people feel inadequate is connecting the jumper cables. This is very understandable, but in the same breath, much unwarranted. When working with electricity, you always have to remember that you are only working with negative and positive charge, and lucky for us, everything is color coded.
When you look on your battery, you should see a plus and minus sign close to each of the terminals. The key is to ensure that you don’t mix the colors up. If the red cable is connected to the positive terminal in the one car, then it should also be connected to the positive terminal on the other vehicle. The same goes for the black side of the cable.
To ease your thoughts, the color of the isolating plastic that covers the cables do not affect the cables themselves. Those colors are purely there to help you make the right connection.
4. The start
Once you have connected the two batteries to each other, it is time to start the car. If your battery was flat, it might take a try or two for your car to start, provided that you made the right connection.
But once your cat started, it would be a good idea to leave the cables connected to the batteries for a little while. This will ensure that enough power is transferred to the flat battery. You would be strongly advised not to turn off your car when you disconnect your cables. Instead, carefully remove one side of the cables, ensuring that the two clamps don’t touch. This causes a short circuit that could be potentially harmful.
Once it is disconnected, you can disconnect the other battery and close both the bonnets.
5. What now?
The reason why your car didn’t start in the first place was that the battery was flat. When you jump start it again, it takes some time for your battery to charge. To ensure that you don’t try and start a dead battery again, leave your car running for a while so that the battery can be charged sufficiently.