
Stuttering, stalling, and lurching might all be great dance moves, but they are terrible things for your car’s engine to be doing. If you are experiencing these kinds of performance issues, you might feel like ripping your hair out. Instead, you should consider ripping out the crankshaft position sensor.
In this article, we will tell you what a crank sensor is and what they are for. We’ll let you know the symptoms of a failing sensor, how to test them, and how to replace them. That way, you can break free from terrible engine issues.
What Is the Crank Position Sensor?
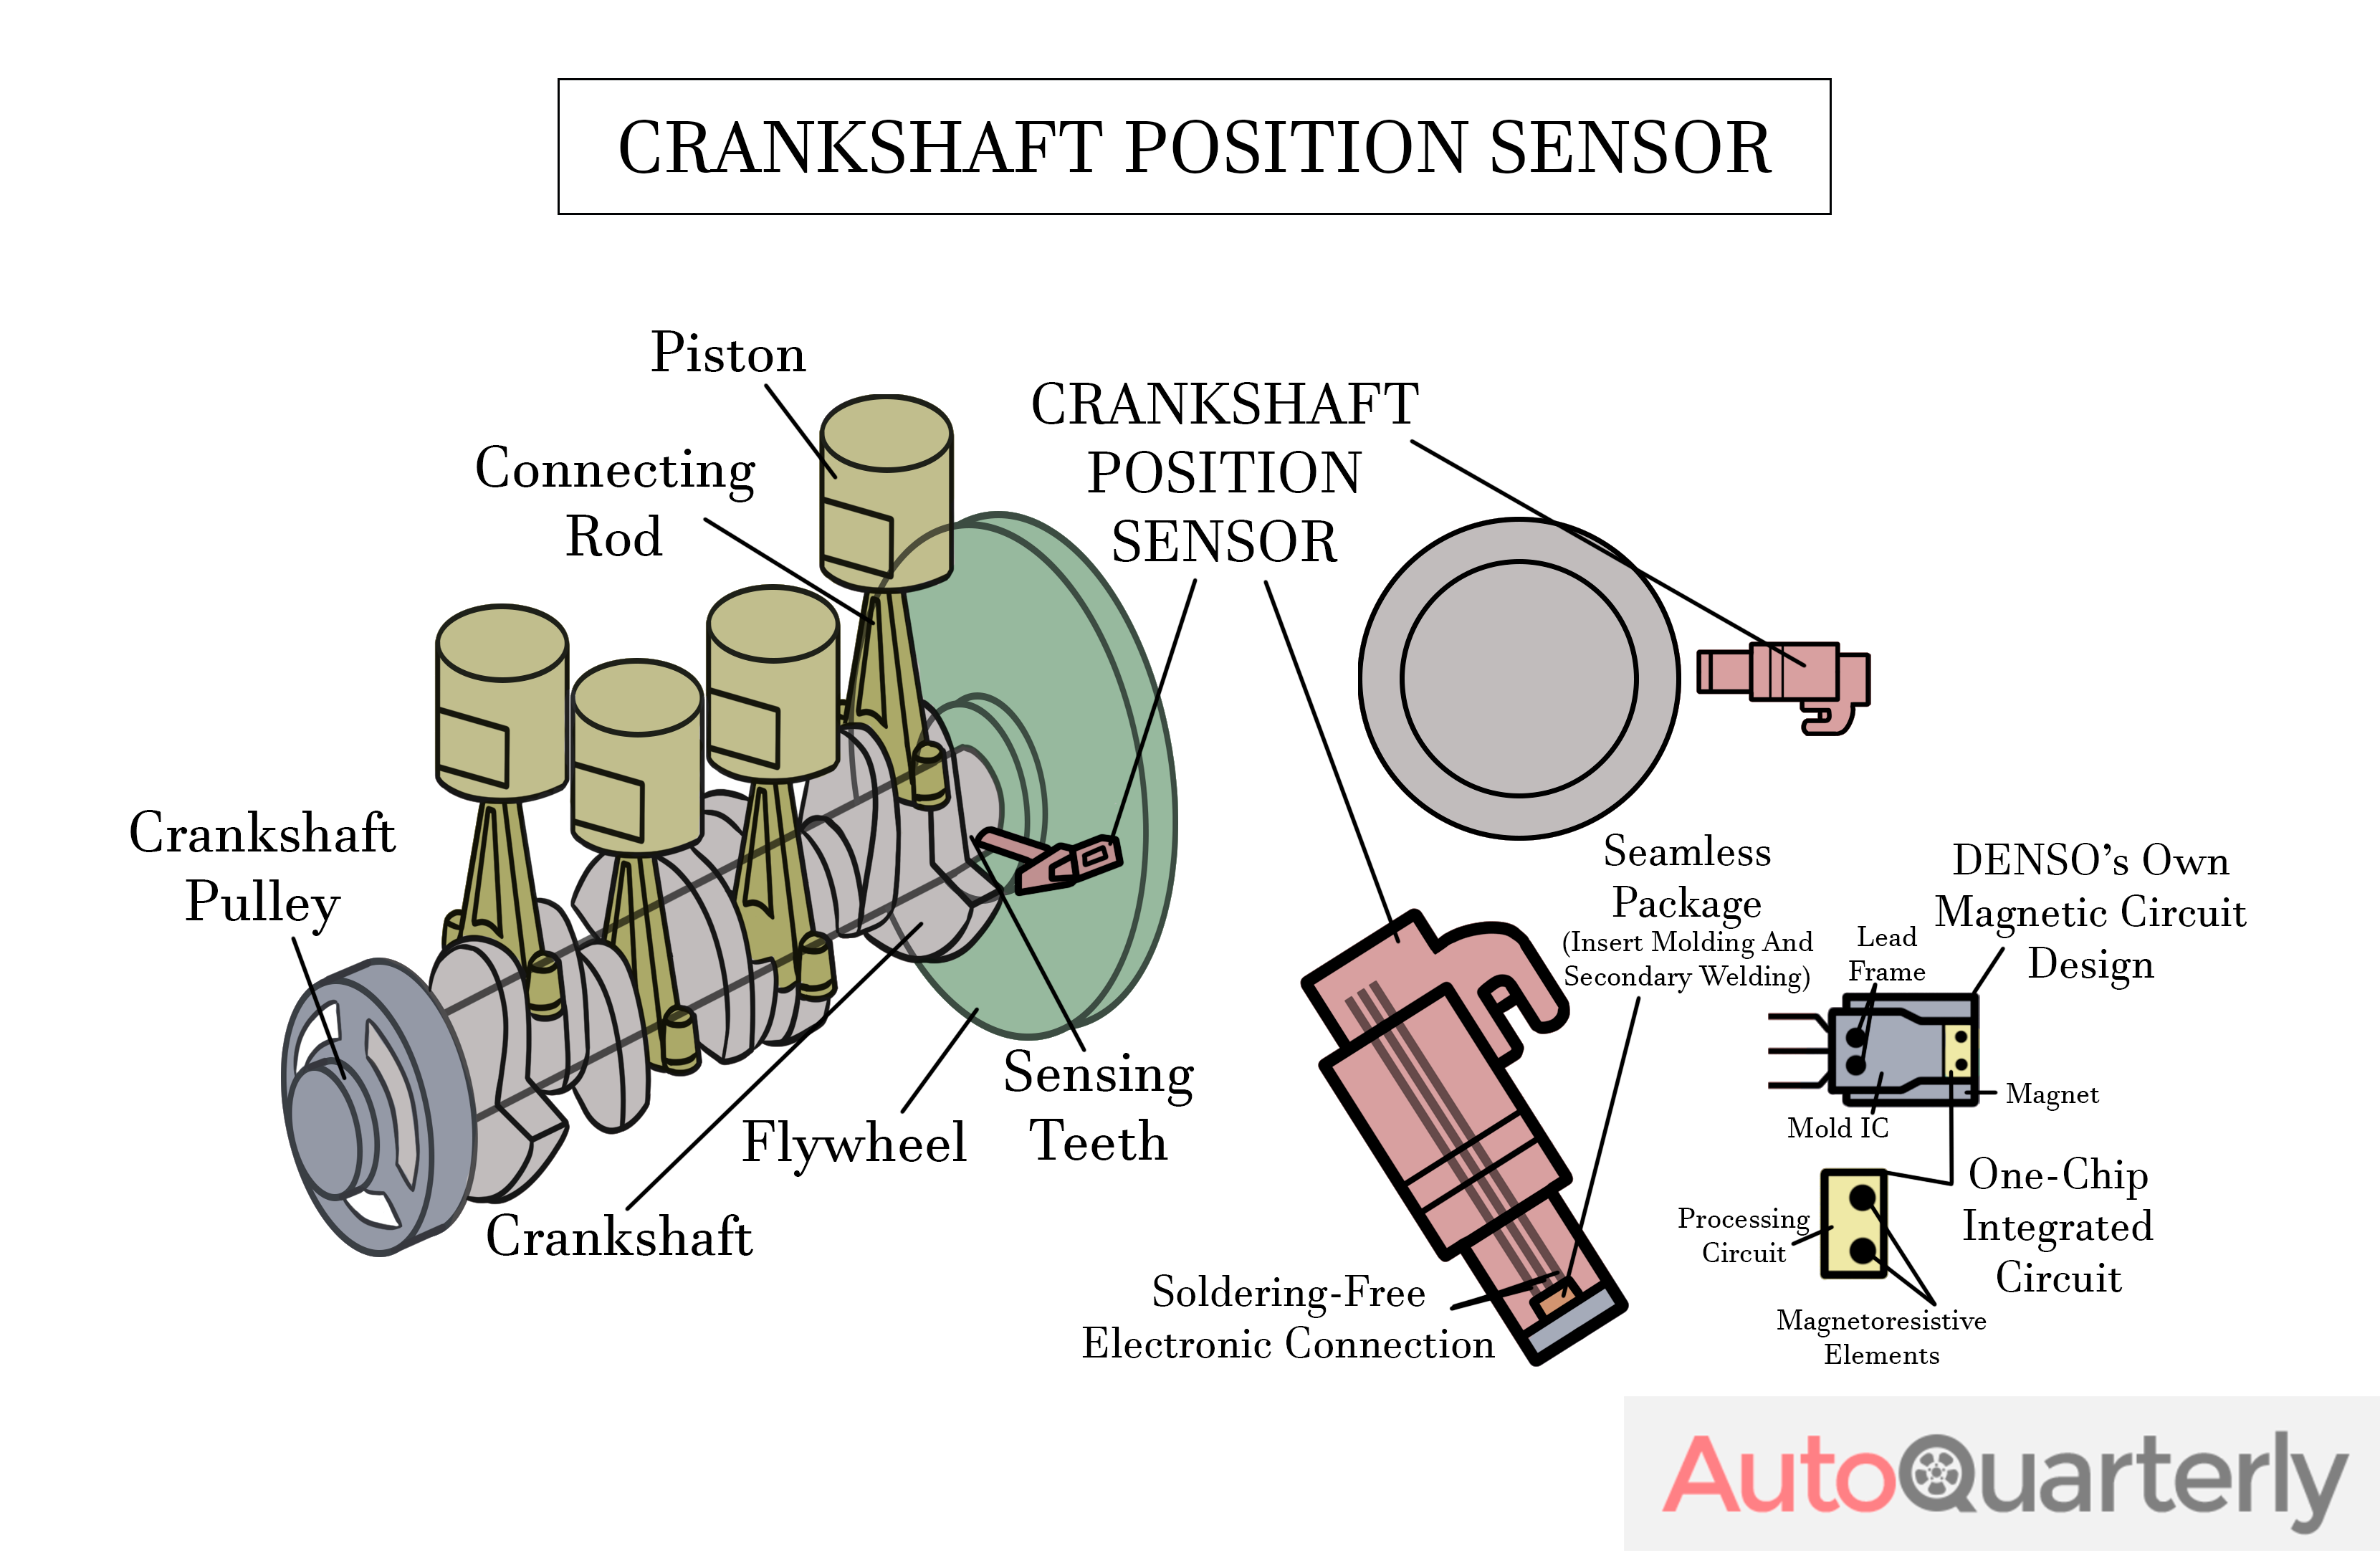
There are a lot of rotating parts on your car. Your wheels rotate, the driveshaft rotates, and the transmission rotates. All those rotating parts are powered by a rotating part in your motor called the crankshaft. The crankshaft is what converts the downward force of the pistons into rotational energy.
The crank also spins very fast. Some cars idle at about 600RPMs, or revolutions per minute. That means that every second, the crankshaft rotates ten times. That’s faster than most people can count, so an electronic sensor is used to keep track of the crankshaft’s speed and degree. Mechanics aren’t very creative when they name things, so they simply called this sensor the crankshaft position sensor.
What the Sensor Is For
Modern cars are full of sensors. There are sensors to measure the airflow, sensors to measure the output shaft speed, and of course, sensors to measure the crankshaft speed and position. A computer (The PCM, ECM, or ECU depending on make and model) uses information from those sensors to keep your engine running optimally.
A four-stroke engine, which you can learn about in this animation, has a power stroke on every other upstroke or every second rotation of the crankshaft. The computer has to calculate when to fire the spark plug, inject the fuel, and adjust the air mixture.
It can only calculate those timings if it knows where the piston is inside the cylinder. Since the crankshaft is connected to the piston directly via the connecting rod, if you know what position the crank is in, you know exactly where the piston is.
Symptoms of a Failing Sensor

A failing crankshaft position sensor is usually bad news for your car. There is little risk that the sensor failure will cause further damage, fortunately, but chances are you won’t be making it to work on time if it fails.
Three main issues can be caused by a crank sensor that has failed. Depending on how badly the system failed and what type of engine controller you have, you may progress through these symptoms as they get worse.
Engine Fault Code
Your car’s computer has a diagnostic protocol called the OBD2 system. When an issue arises, like if a sensor fails or the car starts running poorly, the OBD2 system generates a fault or diagnostic trouble code. On most cars, a fault code will cause the check engine light to illuminate.
Reading Fault Codes
To read the fault codes, you need an OBD2 reader. We recommend a few of them here. When you see the check engine light come on, you simply plug the scanner into the OBD2 port and read the code.
Most code readers don’t have a library of information installed on them, so you will have to look up what the code means. The easiest way is to simply google the error code or look it up on a chart like this one. The P0335 code is the one that will signify a broken or failing crankshaft position sensor.
Poor Engine Performance
If a position sensor is failing or has failed, but the car is still able to run, it won’t run well. You will notice issues when accelerating, loud or unusual noises from the engine, and there may occasionally be gaps where the engine seems to stop running.
Make sure to stop driving if the issues get worse. In addition to the mild performance issues, a bad sensor can cause serious engine performance issues that can harm other systems. If you notice strong vibrations from the engine, or it stalls at an intersection, stop driving. If your car dies in the middle of the road, it can become a risk to yourself and others.
Engine Won’t Start
Two things can cause the engine not to start when a crank sensor goes bad. The first issue is that the engine is simply running so poorly from the issues listed above that it can’t start. The engine’s timing and fuel delivery can get so out of sync that combustion can’t occur, and the engine simply will not run.
The other thing that can cause an engine not to start is a failsafe system in the computer. The computer may detect that the sensor has failed, and it will simply refuse to start in order to protect you and the engine. Generally, if the computer is preventing the start, the car will crank for a long time without trying to start. The fuel injectors simply won’t squirt fuel, so there won’t be any noise other than the starter.
How to Test the Crank Sensor

If you have any of the symptoms above, you need to make sure it’s the crank position sensor giving you issues and not something else. To do that, you are going to need a multimeter. We suggest this one if you don’t have one because it’s easy to use and Klein makes high-quality products. However, a cheaper one will work fine for testing sensors.
You will also need some basic hand tools. A simple socket wrench set is usually sufficient. Some cars may need the front wheel removed to access the sensor easier, which will require a jack and jack stands as well.
Remove the Sensor
There are really only two steps you need to take to remove the sensor. Unfortunately, the first step can be a bit of a challenge, so be aware that you may need to set aside a few hours to make sure your experience isn’t stressful.
Locate the Sensor
On most cars, the sensor will be on the back of the motor close to the transition from the engine block to transmission. However, some modern manufacturers have been known to stick the sensors on the front of the motor near the harmonic balancer, and some manufacturers like to put them deep inside the valley between the heads.
To find it, you will need a manual or to use google for help. A cheap Chilton or Haynes manual that you can get at any auto parts store is sufficient. It is simply very unlikely that you will find and correctly identify the crank position sensor without knowing exactly where it is.
Remove the Sensor
It’s nice when there are only two steps and the second step is easy. Once you have located the sensor, they are usually only held in with a single bolt. Remove the bolt, pull the sensor out, and unplug it.
If the sensor is a bit difficult to get to, you should use extensions and universal joints to make it easier. A common mistake that less experienced mechanics make is trying to fit a large socket wrench into a small space and swing it. Instead, use attachments to get the wrench up and out where you can easily operate it.
Test for an Open Circuit
To test for an open circuit, which will indicate that an internal part of the sensor has failed, you need to turn your multimeter to the continuity setting on the dial. If you have a multimeter that doesn’t have a continuity setting, then turn it to the ohms/resistance setting instead. It is always customary to touch the leads together for fun and make sure that the meter will beep for continuity or read open for resistance.
Then test the sensor by placing one lead in the center of the plug and one lead on one of the plug’s side sockets. You want there to be continuity through the sensor. Be sure to try all combinations of wire. Some manufacturers use the center for ground, some use it for voltage, and there isn’t really a standard. If there is no continuity through the sensor, then it is bad.
If you would like to see the process in action, this gentleman on YouTube walks you through all the steps.
Replacing the Sensor
Once you know the sensor is bad, it’s easy to replace. In fact, if you went through all the steps to remove and test the sensor, all the real work is already done. Simply buy a new one and install it.
These sensors are fairly inexpensive, usually running you between $20 and $100 depending on make and model. GM cars and trucks usually have very cheap parts, and the sensor can be less than $10. In contrast, the sensor for a BMW 335i is over $100, so it’s hard to say how much you’ll have to spend.
Keeping Clean
Whenever you replace an engine sensor, it’s important to keep the sensor and the area clean. These sensors are usually installed onto holes that go directly into your engine. Getting dirt or grime into the engine can cause premature wear or other issues.
Simply wipe down the areas with a degreaser, and only handle the new sensor with clean hands. Some people will apply a small amount of oil to the sensor’s o-ring and exterior before installing it. It’s not wholly necessary, but if you have some engine oil handy, it can help keep dirt out of the engine while installing the sensor.
Paying a Mechanic
Any auto shop or mobile mechanic will be able to quickly replace a sensor. Don’t feel bad if you don’t have the tools necessary to test or replace the sensor yourself; mechanics will probably only charge you an hour of shop time to do the job.
That means you can expect to pay between $100-200 for the replacement. That mostly depends on how much the sensor costs. Bring your favorite shop a box of donuts, and they might even throw in a computer reset for free.
Don’t Let Bad Sensors Stop You
Poor engine performance can ruin your day. Don’t put up with it. Grab that bad sensor, rip it out, and toss a new one in. Get back on the road and back into having fun. We hope this article will inspire you to go for it.